Friday, May 27, 2011

How To Fix and Avoid Printer Paper Jams

Friendly Computers would like to share this article with you.

Printer jams occur when the paper feeding through the printer goes awry. Sometimes the printer ignores the problem, soldiers onward, and extrudes a crumpled mess into the output tray; on other occasions, the printer stops in midjob, and the crumpled mess--or part of it--remains trapped somewhere inside the machine.

When a paper jam occurs, some printers flash lights at you and scream for help. Others sense where the jam is and provide guidance on clearing the blockage. If your printer offers diagnostic advice, follow it. Also, take time to check the printer's documentation for help in clearing jams. Here are the basic steps you'll follow to correct the problem:

  1. Turn off the printer. If you're going to be working inside the printer, you don't want any trouble with electricity or moving parts. And if you're dealing with a laser printer, you also don't want the fuser to generate additional heat. If the paper is jammed in or near the fuser unit (you'll feel the heat as you come near it), you'll have to wait for the fuser to cool off before clearing the jam.
  2. Open all doors leading to the paper path. If you can't tell which door leads to the paper jam, start by removing or opening the input tray and following the paper path all the way to the output tray, opening every door or panel that you can find along the way.
  3. Carefully pull out paper sheets and scraps. Check for paper sheets that are stuck or askew, as well as for paper scraps. Pull paper out of the path firmly but very carefully and slowly. When possible, pull paper in the direction it is supposed to go in under normal conditions--not backward, which could strain the printer's mechanics.Take care to remove all of the paper: As any scraps that remain could cause further jamming. If you have the misfortune of breaking a mechanical piece in the printer, stop what you're doing and call for service.
  4. Close all doors and turn on the printer. Once switched on, the printer should reset itself automatically. If the printer reports that it is still jammed, double-check for stray paper scraps, and then close all the doors again. If the printer continues to complain, try turning it off and then back on. If the complaints continue, you'll have to call for service--and hope that a deep-seated piece of paper--rather than a broken mechanical part--is the source of the problem.

To avoid a jam next time:

  1. Use only one kind of paper at a time in your input tray.
  2. Whether you have a single input tray in your printer's driver or many input trays, tell the printer what kind of paper you have in the tray: Most printer controls include a section or drop-down list where you can pick a paper by name, type, thickness, or other quality.
  3. If you aren't sure whether your printer takes a certain kind of paper, check its documentation.
  4. When you reload your input tray, pay attention to the tray's needs, such as how the paper should be loaded and whether the length or width guides need adjusting.

Source: http://www.pcworld.com/article/227252/how_to_fix_and_avoid_printer_paper_jams.html

Wednesday, May 25, 2011

How to avoid or remove Mac Defender malware

Friendly Computers would like to help you to avoid or remove Mac Defender malware.

Summary

A recent phishing scam has targeted Mac users by redirecting them from legitimate websites to fake websites which tell them that their computer is infected with a virus. The user is then offered Mac Defender "anti-virus" software to solve the issue.
This “anti-virus” software is malware (i.e. malicious software).  Its ultimate goal is to get the user's credit card information which may be used for fraudulent purposes.
The most common names for this malware are MacDefender, MacProtector and MacSecurity. 
In the coming days, Apple will deliver a Mac OS X software update that will automatically find and remove Mac Defender malware and its known variants.  The update will also help protect users by providing an explicit warning if they download this malware. 
In the meantime, the Resolution section below provides step-by-step instructions on how to avoid or manually remove this malware.

Products Affected

Mac OS X 10.4, Mac OS X 10.6, Mac OS X 10.5

Resolution

How to avoid installing this malware

If any notifications about viruses or security software appear, quit Safari or any other browser that you are using. If a normal attempt at quitting the browser doesn’t work, then Force Quit the browser.

In some cases, your browser may automatically download and launch the installer for this malicious software.  If this happens, cancel the installation process; do not enter your administrator password.  Delete the installer immediately using the steps below.

  1. Go into the Downloads folder or your preferred download location.
  2. Drag the installer to the Trash. 
  3. Empty the Trash.

How to remove this malware

If the malware has been installed, we recommend the following actions:

  • Do not provide your credit card information under any circumstances.
  • Use the Removal Steps below.

Removal steps

  • Move or close the Scan Window
  • Go to the Utilities folder in the Applications folder and launch Activity Monitor  
  • Choose All Processes from the pop up menu in the upper right corner of the window
  • Under the Process Name column, look for the name of the app and click to select it; common app names include: MacDefender, MacSecurity or MacProtector
  • Click the Quit Process button in the upper left corner of the window and select Quit
  • Quit Activity Monitor application
  • Open the Applications folder
  • Locate the app ex. MacDefender, MacSecurity, MacProtector or other name
  • Drag to Trash, and empty Trash

Malware also installs a login item in your account in System Preferences. Removal of the login item is not necessary, but you can remove it by following the steps below.

  • Open System Preferences, select Accounts, then Login Items
  • Select the name of the app you removed in the steps above ex. MacDefender, MacSecurity, MacProtector
  • Click the minus button

Use the steps in the “How to avoid installing this malware” section above to remove the installer from the download location.

Note: Apple provides security updates for the Mac exclusively through Software Update and the Apple Support Downloads site. User should exercise caution any time they are asked to enter sensitive personal information online.

Source: http://support.apple.com/kb/HT4650

Wednesday, May 18, 2011

Six Things That Block Your Wi-Fi, and How to Fix Them

Friendly Computers Found this article useful and would like to share it with you.

Does your wireless network seem slow? A recent study by Epitiro, a UK-based broadband-analysis firm, shows that consumers lose an average of 30 percent of the data speed their broadband connection supplies when they use Wi-Fi connections in the home.

Why the slowdown? You've probably heard that some household electronic devices, including microwave ovens, baby monitors, and cordless phones, hamper Wi-Fi performance. To separate fact from fiction, we did some research and consulted an expert on the topic: Nandan Kalle, networking business unit manager for router manufacturer Belkin.

1. Public Enemy Number One: Your Neighbors' Wi-Fi Networks

"I'd say the biggest source of interference today for most people is their neighbors' Wi-Fi networks," says Kalle. The problem is that most existing Wi-Fi equipment operates on the crowded 2.4GHz band. "There are basically three nonoverlapping channels. I always describe it as a three-lane road that's really, really busy," Kalle adds.

If you use a 2.4GHz router and live in a densely populated area, your neighbors' Wi-Fi networks could interfere with yours, hindering the performance and range of your wireless network.

Linksys by Cisco Dual-Band Wireless-N Gigabit RouterThe solution: Buy a dual-band router that operates simultaneously at 2.4GHz and 5GHz. While the 2.4GHz band is necessary for supporting older Wi-Fi devices, 5GHz "is almost like an 11-lane highway that nobody's heard about yet," Kalle says. "There's much less congestion."

Newer Wi-Fi devices, including tablets such as the Apple iPad and Motorola Xoom, Internet-ready TVs with built-in Wi-Fi, gaming consoles, and business laptops, are all dual-band. "They all play in the 5GHz band. They can take advantage of that empty highway, and that's really going to help," Kalle says.

It's important to get a router that supports simultaneous 2.4GHz and 5GHz, such as the $100 Cisco Linksys E2500. Some older dual-band routers allow only one band at a time; that's a problem if you have older Wi-Fi devices (as most people do), because you'll have to leave your router at 2.4GHz. "You won't get any benefit from the 5GHz mode," says Kalle.

When you're shopping for a new router, look for a dual-band, 802.11n MIMO device, which typically has an "N600" label. The "N" refers to 802.11n, an international Wi-Fi standard approved in 2009. MIMO(multiple input, multiple output) technology provides greater range by using multiple antennas to transmit and receive data. And "600" refers to two bands, each transmitting at 300 megabits per second.

2. Household Electronics

Is your microwave oven, cordless phone, or baby monitor sabotaging your Netflix stream? Perhaps.

Most problems with cordless phones and microwaves involve products that use the 2.4GHz band. Many baby monitors operate at 900MHz and won't interfere with Wi-Fi. However, some wireless monitors are 2.4GHz, which can interfere with 802.11g or single-band 802.11n routers.

The solution: When choosing a wireless baby monitor, look for a 900MHz model such as the Sony 900MHz BabyCall Nursery Monitor ($45). Alternatively, get a Wi-Fi-friendly system such as the WiFi Baby 3G ($272), which connects to your existing wireless network.

Newer cordless phone systems like the Panasonic KX-TG6545B ($140) use DECT 6.0 technology and the 1.9GHz band, not the 2.4GHz or 5.8GHz bands.

3. Bluetooth Devices

Motorola Finiti Bluetooth headsetOlder Bluetooth devices did interfere with Wi-Fi networks--but those days have passed.

"Over the past several years, Bluetooth and Wi-Fi manufacturers have implemented specific techniques to minimize interference," says Kalle.

The solution: "Most people replace their phones every couple of years, so unless you have a really old phone or Bluetooth device, it's unlikely that [Bluetooth] will interfere with Wi-Fi," says Kalle.

4. Humans

You might recall from science class that the human body is mostly water, anywhere from 45 percent to 75 percent depending on your age and fitness level. Water can hamper Wi-Fi speeds, too.

"For example, say your room is very crowded and you're having a party. That can actually dampen your Wi-Fi signal--but that's an extreme case," says Kalle.

"When we're doing Wi-Fi testing in the lab and trying to get very accurate results, we have to make sure that we're not standing in front of the antenna, because we'll measurably impact the performance," he adds.

Humidity can affect Wi-Fi speeds too, but not enough for the average user to notice.

The solution: Relax. Don't worry about humidity, or those bags of water called people. After all, you can't control the weather, and it's unwise to be antisocial just to get better Wi-Fi performance.

5. Security Settings

Computer securityIn some low-end routers, a stronger security setting can moderately affect performance. However, that doesn't mean you should turn off security completely, or downgrade to weaker protection.

In recent years, the WPA (Wireless Protected Access) and WPA2 protocols have displaced the older and less-secure WEP (Wireless Encryption Protocol). On inexpensive routers that use WEP, upgrading to WPA may impede performance a bit. In contrast, more-robust devices generally have hardware specifically designed for WPA and WPA2 encryption; as a result, the stronger security protocols shouldn't slow Wi-Fi speeds on higher-end routers.

The solution: Kalle stresses the importance of router encryption. "You always hear about data theft, and it's so easy to enable security these days," he says. Since today's routers have security enabled out of the box, users don't have to worry about configuring it. But don't disable encryption, even if doing so may speed up your Wi-Fi a little.

6. Old Firmware

Why upgrade your router's firmware? Well, for performance improvements and occasionally a new feature or two.

"Whenever you have a problem, check to see if you have good firmware. Sometimes there are little bugs out there, and the router manufacturer may already have a fix," says Kalle.

When you buy a new router, it's always a good idea to check for the latest firmware as well.

The solution: Keep your firmware up-to-date. With older devices, you'll have to access the router's administrative interface--typically through a Web browser--to check for updates. The process is getting easier, though. "Our routers have an application--it's almost like iTunes--that tells you whenever there's new firmware available," says Kalle. "The user can update by just pushing a button."

Although the workings of your router may seem mysterious, following these simple tips can go a long way toward keeping your home wireless network in working order.

Source: http://www.pcworld.com/article/227973-2/six_things_that_block_your_wifi_and_how_to_fix_them.html

Wednesday, April 20, 2011

What To Do When Your Email Account is Compromised

Friendly Computers found this article useful and would like to share it with you.

More and more I see spam coming from friends when I open my e-mail. In addition to this, people are telling me that they think their e-mail accounts have been hacked. Signs can be friends receiving messages you did not send, mail is marked read that they never saw, settings are changed, or anything else out of the ordinary. In any case, the question is the same: “What do I do?”

While many Ghacks readers may know to follow these steps, having a guide handy for others is a useful thing. I can imagine many readers are resources for friends, family, and coworkers. These steps can serve as a checklist to ensure thoroughness.

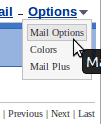
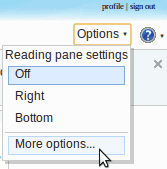
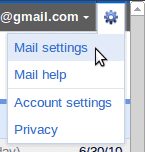
his is a guide on how to reasonably secure your e-mail account. What to do if you lose access to your account is a different problem for another article. This article assumes you still have access, but strange things (as mentioned) are going on. It will cover the three most commonly used e-mail account types: Gmail, Hotmail, and Yahoo Mail. While changing the settings is pretty easy, finding them can be less than obvious. Here are some screenshots to help you find the general settings page for your account.

YahooMail
Hotmail
 
Gmail
Step 1 : Change Your Password

You need to do this immediately. This is akin to changing the locks on your doors. When you do not know exactly who has a key to your home, the locks are a liability. Count yourself lucky that you can get into your account. To change your password, log-in and go to Settings. Then follow the steps appropriate to your account.

  • In Gmail: Mail Settings > Accounts and Imports > Change Password
  • In Hotmail: More Options > Account Details (look for “Change” next to password)
  • In Yahoo Mail: Mail Options > Account Information > Change your password
Step 2 : Check Your Recovery E-mail Address

Your recovery e-mail address is the one that you use to reset/regain your password. However, if it was changed, it can be used to get the password to your account. Take a look to see if it is set to another account you own. If not, change it immediately. You also may want to follow these steps on that account.

  • In Gmail: Mail Settings > Accounts and Imports > Change Password Recovery Options
  • In Hotmail: More Options > Account Details (look for “Remove” next to an odd e-mail)
  • In Yahoo Mail: Mail Options > Account Information > Update password-reset info
Step 3 : Change Your Hints

Most people forget about this, but it is a good idea to change your hints. If the hacker knows the answer, they may be able to regain access. This usually requires the recovery e-mail address to be altered, but it is still better to change your hints. Since hints are usually used to reset passwords, they can be used to change your password.

  • In Gmail: Mail Settings > Accounts and Imports > Change Password Recovery Options
  • In Hotmail: More Options > Account Details (look for remove next to a question)
  • In Yahoo Mail: Mail Options > Account Information > Update password-reset info
Step 4 : Check Your Forwards

Checking your forwards is going to be a tedious process, but it is important. If you only have time to skim them over, then do so but make a thorough look your next priority. Your bank account may depend on it. Your e-mail account can be set up to send letters to other e-mail accounts. Most websites are set up to send new passwords to your e-mail address. That means that an unscrupulous person could ask the site for your password, set up your account to forward it to an account they have access to, and the get into the site. That could be a bank site, a blog, FaceBook, or anything else.

  • In Gmail: Mail Settings > Forwarding and POP/IMAP
  • In Hotmail: More Options > Email forwarding
  • In Yahoo Mail: Mail Options > POP & Forwarding (note: a premium service)
Step 5 : Change All Your Passwords on Connected Accounts

Sadly, you have to assume that your forwards are compromised. You are going to have to go through each site you used your e-mail account to sign up with and change the password and hint. You might even want to associate them with a separate account to isolate critical e-mails. Alternatively, you could just change your password and hint on sensitive sites. Your bank and any financial websites should be first. Social networking site like FaceBook and Twitter should be next.

Keep in Mind

You should always use a strong password for your accounts: one with uppercase, lowercase, numeric, and symbol characters. Ideally, you should have a different one for each account. At the very least your e-mail, financial, and social networking sites should have separate passwords. Security is not about absolutes, but about making it difficult for others to gain access to you account.

It is worth noting that each of these services has an extra security feature. You can actually set up your account to use your phone for e-mail recovery. As I have not used it, it is beyond the scope of this article, but is worth considering.

Addendum

If you have troubles logging in at all, you may want to take a look at the following guides to resolve the problem:

The guides aid you in password, username and account recovery.

Source: http://www.ghacks.net/2011/04/11/what-to-do-when-your-email-account-is-compromised/

Friday, April 15, 2011

Top Automation Tools to Look At

Friendly Computers found this article useful and would like to share it with you.

Here are some Automation tools that you should look at. They are free and can help you different ways.

Data Visualization

It is an easy way to create reportsfrom any data.  You can easily create report layouts and import data from almost any data base system like Oracle, MySQL, PostgreSQL, Firebird, MS SQLServer, IBM DB2, Interbase, SQLite or from external files and create hundreds of documents in whatever format you want (PDF, RTF, XLS, XML). Cost: Free

DataVisualization 400x244 Top Automation Tools to Look At

The application works on a variety of OS formats:  Linux, MS WindowsXP/Vista/2003/7 ,  and Mac OS .  It supports  English, Spanish, and Polish.

[Download Link]

Do It Again

If you’ve ever wanted a task to be repeated on your computer, this program will help you do that. It allows you to make your computer automatically perform a task for you, whenever you want.  For example, if there is something that you do on your computer over and over, and you do it exactly the same way every time (such as backing up your pictures, checking web-based email for new messages, etc.), you can tell Do It Again how to perform that task (by doing it once yourself to create the new task). After that you record a task (or macro) then sit back and watch as your computer automates that task, clicking the mouse and pressing the keyboard by itself.  If it helps, this is also called macro or automation software, as it allows you to record a macro, then play it back to automate the actions of that macro. Cost: Free.

DoItAgain Top Automation Tools to Look At

[Download Link]

Auto Mute

Control the sounds on your PC. How?  This small software utility  will make your PC silent when it’s turning on or is waking up. Solution is very easy! The sound is automatically muted when the computer is turning off or is going to suspend mode. The next system start is absolutely silent even if you forgot to turn the sound off in previous session. After that you can enable sound effects manually, using a shortcut combination. Moreover, you may use this keyboard shortcut to quickly switch the sound on and off.

Why is this program beneficial? Well around your house if you have small children trying to sleep, it won’t wake them up. If you are at work, you can control the sound there too.

AutoMute Top Automation Tools to Look At

[Download Link]

Source: http://www.windows7news.com/2011/04/13/top-automation-tools/

Monday, April 4, 2011

How to Remove Win 7 Anti-Spyware 2011 (Fake Anti-Virus Infections)

Friendly Computers found this article useful and would like to share it with you.

If your PC is infected with the Win 7 Anti-Spyware 2011 malware or something similar, you’ve come to the right place, because we’re going to show you how to get rid of it, and free your PC from the awful clutches of this insidious malware (and many others)

Win 7 Anti-Spyware 2011 is just one of many fake antivirus applications like Antivirus Live, Advanced Virus Remover, Internet Security 2010, Security Tool, and others that hold your computer hostage until you pay their ransom money. They tell you that your PC is infected with fake viruses, and prevent you from doing anything to remove them.

This particular virus goes by a lot of names, including XP Antispyware, Win 7 Antispyware, Win 7 Internet Security 2011, Win 7 Guard, Win 7 Security, Vista Internet Security 2011, and many, many others. It’s all the same virus, but renames itself depending on your system and which strain you get infected with.

The What Now?

If you aren’t familiar with this one, it’s time to take a look at the face of an awful scam. If you are infected, scroll down to the section where we explain how to remove it.

Once a PC is infected, it’ll display this very official-looking window, which pretends to scan your PC and find things that are infected, but of course, it’s all a lie.

image

The really crazy thing is that it pops up a very realistic looking Action Center window, but it’s actually the virus.

image

Removing Rogue Fake Antivirus Infections (General Guide)

There’s a couple of steps that you can generally follow to get rid of the majority of rogue antivirus infections, and actually most malware or spyware infections of any type. Here’s the quick steps:

  • Try to use the free, portable version of SUPERAntiSpyware to remove the viruses.
  • If that doesn’t work, reboot your PC into safe mode with networking (use F8 right before Windows starts to load)
  • Try to use the free, portable version of SUPERAntiSpyware to remove the viruses.
  • Reboot your PC and go back into safe mode with networking.
  • If that doesn’t work, and safe mode is blocked, try running ComboFix. Note that I’ve not yet had to resort to this, but some of our readers have.
  • Install MalwareBytes and run it, doing a full system scan.
  • Reboot your PC again, and run a full scan using your normal Antivirus application (we recommend Microsoft Security Essentials).
  • At this point your PC is usually clean.

Those are the rules that normally work. Note that there are some malware infections that not only block safe mode, but also prevent you from doing anything at all. We’ll cover those in another article soon, so make sure to subscribe to How-To Geek for updates (top of the page).

Removing Win 7 Anti-Spyware 2011

Download a free copy of MalwareBytes, copy it to a thumb drive, and then install it on the infected PC and run through a scan. You might have better luck doing this in Safe Mode.

image

You may have better luck installing MalwareBytes first, if the virus will let you. In my case, it did not. When I scanned through the first time using SUPERAntiSpyware, it detected the viruses and removed the files just fine.

image

At this point, you should hopefully have a clean system. Make sure to install Microsoft Security Essentials, and don’t be fooled by these viruses again.

Can’t Open Any Applications After Deleting the Virus?

The next problem was that once the virus was removed, you couldn’t open anything—in fact, I still wasn’t even able to install MalwareBytes. Hopefully you have better luck.

Why couldn’t I open anything? Because the virus had rewritten the registry to force all applications to open the virus instead—which meant you couldn’t even open the registry editor to fix the problem. This problem might have been avoided had I properly completed the scan, but I interrupted it before it was done.

On a normal PC, there’s a registry key under HKEY_CLASSES_ROOT that specifies what happens when you double-click on an executable file (*.exe) – but on a virus-infected system, this value is rewritten with the virus executable. That’s how it prevents you from opening anything.

image

To fix the problem, I exported a clean registry file from another PC, and did a little extra hacking to it, and problem solved! All you have to do is download, extract, copy the .reg file to the infected PC, and double-click it to add the information into the registry.

Download the Fixing Malware Appliction Won’t Open Registry Hack

Source: http://www.howtogeek.com/57837/how-to-remove-win-7-anti-spyware-2011-fake-anti-malware-infections/

Friday, March 25, 2011

Get Started With a VPN: For Beginners, Power Users

Friendly Computers found this article useful and would like to share it with you.

Do you want to be secure--I mean really secure--when you're on the Internet? If so, then you want a virtual private network.

A VPN creates a secure "tunnel" across the Internet between you and your office, a VPN provider, or your home. Why would you want that? Easy-to-use programs such as Firesheep make it easy for snoops to see what you're writing in your e-mail messages, posting to your Facebook page, or buying online. But with a VPN, you can surf the Web through that virtual tunnel, away from prying eyes, and your Internet traffic is encrypted.

Whether you just want to access Wi-Fi networks on the road without potentially exposing your activities to nosy strangers, or whether you need to enable a team of remote employees to handle business securely on the Internet, you can find a VPN to fit your needs. This guide will walk you through VPN essentials for beginners and power users.

VPN for Beginners

The easiest and least costly way to get a VPN service is to obtain one from your company, school, or organization. Not on the road often? Check with your IT department to see if they offer a VPN to all users. If they do, life is good: Just install the corporate VPN software, set it up, and you're ready to go. The next time you turn on your PC, fire up the VPN application before you start surfing the Web.

What if your IT department doesn't have a VPN--or what if you don't have an IT department? You're not out of luck. Lately, numerous VPN providers, including Banana VPN, Black Logic, LogMeIn Hamachi, and StrongVPN, have started offering their services for a fee, generally from $15 to $20 a month. To learn more, take a look at a comparison of three personal VPN services.

How do you go about picking one? If a service has an online forum, check what their customers have posted. Call or e-mail to see if real people answer. Generally speaking, bigger is better. If they're a tiny company, that may be fine for you as an individual, but they probably can't give you the support a small company needs.

Is the privacy factor alone worth the effort? Yes, but VPNs offer other advantages as well. For example, if you're in Canada, ordinarily you can't watch a U.S. TV show on Hulu. But you can access the show if you use a VPN to obtain a U.S. IP (Internet Protocol) address.

Some VPN providers offer another benefit: anonymous Web browsing, which allows you to roam the Internet without being tracked. If your ISP blocks some applications, such as Skype or other VoIP (Voice over Internet Protocol) applications, you can use a VPN to get around the restrictions.

These VPN services may sound exactly like what you need. Beware, however: Not all services are created equal. If a service doesn't have enough VPN servers--technically, VPN concentrators--to support the number of customers, you may experience poor Internet speeds or be unable to make a connection at all.

So, before subscribing to a VPN service, look into what its customers say about it. Better still, if the company offers a free test period, take advantage of it before paying money for a service that may not meet your needs.

VPN Fundamentals for the Power User

Do you want to lock down your Internet connection when you’re on the road? If so, the best approach is, of course, to use a VPN. You’re set if you work for a company that can provide you with a VPN. But if you run your own small business or home office, you also have options.

You can find several, inexpensive ways to get a VPN of your own. Besides paying $15 to $20 a month to a VPN subscription service, you might be able to install a VPN server into your router using open-source, alternative router firmware such as DD-WRT and OpenWRT. This firmware will allow you to use many, but not all, Wi-Fi routers and access points as VPN endpoints.

VPN on Your Router

Before flashing your Wi-Fi hardware with any alternative firmware, make sure that it's supported. The last thing you want to do is to "brick" your wireless device--rendering it useless--just to set up a small VPN. Be sure to consult the DD-WRT supported-device list or the OpenWRT supported-device list. As these lists are all works in progress, check back often if you buy a brand-new router or access point.

If you'd rather not take your hardware's life into your own hands, some routers, such as Buffalo Technology's WZR-HP-G300NH AirStation Nfiniti Wireless-N High Power Router, come with DD-WRT already installed.

VPN Server Software

Some desktop operating systems, including Windows (from XP to Windows 7) and Mac OS X, include VPN server software. Granted, these are very simple VPNs, but they may be all you need. Of course, the Windows Server family comes with more-sophisticated VPN setups. If you're running all Windows 7 clients and Windows Server 2008 R2, you may also want to consider using DirectAccess, an advanced IPSec VPN that runs over IPv6 on ordinary IPv4-based LANs and the Internet.

If you don't choose to use DirectAccess but opt for Microsoft's older VPN technologies, Windows Server 2008 R2 has a helpful new feature: VPN Reconnect. Just as the name suggests, it will try to connect VPN sessions automatically if they're interrupted by a break in Internet connectivity. This function can be handy for users with spotty Wi-Fi connectivity, since they won't need to manually reconnect with the VPN after they reestablish a network connection.

Another way to add a VPN to your small network is to install VPN server software yourself. The best known of these is OpenVPN, which is open-source. It's available in versions for almost all popular desktop operating systems, including Linux, Mac OS X, and Windows.

If setting up native OpenVPN sounds a little too technical for you or your staff, you can run it as a VMware or Windows Virtual Hard Disk OpenVPN virtual appliance. With this arrangement, you'll have a basic VPN up and running in minutes.

But OpenVPN is far from the only VPN software out there. Other programs worth considering are NeoRouter and Tinc. If you want more than just VPN services and do-it-all network-services software packages, I highly recommend the open-source Vyatta, Core 6.1. Vyatta includes OpenVPN.

VPN Appliances

If you plan on having more than a dozen or so users on the VPN at one time, though, you'll want to use an inexpensive VPN hardware appliance such as the Juniper Networks SA700 SSL VPN Appliance, the SonicWall Secure Remote Access Series, or the Vyatta 514.

No matter which VPN you use, you'll need to set your firewall to allow VPN traffic. On many routers and firewalls, this task can be as simple as setting VPN passthrough to allow VPN traffic. Typically, your choices will be PPTP (Point-to-Point Tunneling Protocol), L2TP (Layer Two Tunneling Protocol), or SSL (Secure Sockets Layer). Allow only those VPN protocols that you'll be using--after all, when in doubt with firewalls, it's safer to forbid than to permit.

Check your VPN’s documentation to see which ports you’ll need to open. As for SSL VPNs, they typically use port 443, the usual port for SSL-protected Web servers, so that port should already be open.

OpenVPNNaturally, no matter what VPN you're running and regardless of your network setup, a VPN in a small business is likely to limit its users’ speeds. For example, in my own home office, my Charter cable Internet connection gives me a 25-megabits-per-second downlink and a 3-mbps uplink. This means that no matter how fast my remote network connection is when I connect to my OpenVPN server, my maximum throughput will be limited to 3 mbps.

I've often seen small businesses flummoxed by slow VPN connections. That usually happens because neither the users nor the in-house IT staffers (often one and the same) realize that the math of Internet connections means that the slowest link along the VPN route will determine the VPN's top speed. If you want a really fast VPN, you'll need to bite the bullet and get a high-end Internet connection from your ISP.

Source: http://www.pcworld.com/businesscenter/article/223044-1/get_started_with_a_vpn_for_beginners_power_users_and_it_pros.html

Monday, March 21, 2011

Hibernate VS Sleep VS Shut-Down

Friendly Computers found this article useful and would like to share it with you.

There are many ways to shut down and restart your computer, but – which does what, and which should you use when ?

The answer depends mostly on you. Are you into saving energy or boot-up time? How often do you leave your computer and for how long ?

There are three main shut-down options available in Windows: Shut-Down, Sleep and Hibernate (names may vary depending on the Windows version). In Vista and Windows 7, there is also a fourth option; Hybrid Sleep.

Let’s explore the topic.

Environmental friendly

If your concern is to save energy, and you don’t mind the longer Boot Up time – then you should always use the “Shut Down” option. This will shut down every running service and application and wipe clean your RAM. This option saves the most energy as the computer is not using any power at all when in this state. There might be some power consumption from the main-board as it is still connected to your outlet, but this is significantly little.

Hibernate Vs Sleep

The difference between the two is power-consumption – one use less power than the other.

Sleep Feature = Pause

129107 simple red square icon media a media27 pause sign 220x220 Hibernate VS Sleep VS Shut DownSleep is a power-saving state which keeps enough voltage across your RAM to retain the memory for when you “wake up” your computer again.  This mode use the most power of all the “Power-Off Modes” as the computer need to be able to keep your RAM alive. The Sleep Feature is recommended when you leave your computer for a short period (like going to lunch or step out for a few hours). Putting your computer into the sleep state is like pausing a DVD player—the computer immediately stops what it’s doing and is ready to start again when you want to resume working (usually within seconds).

Hibernate

The Hibernate function was intended primarily for laptop users (though available for Desktop Computers as well). This mode let you save much more power when not using your computer (as in saving battery). When you put the computer in Hibernate Mode, it stores the contents of your RAM (Services, clipboard etc.) to your hard-drive (hiberfile.sys) which on reboot is read back into the RAM which takes about a minute to be completed, but on the upside you do save more energy.

Hybrid Sleep

Hybrid sleep is both Sleep and Hibernate, primarily intended for Desktop Computers. Hybrid Sleep keeps the RAM alive (as in Sleep Mode) and stores the Content of your RAM to your Hard-Drive (in case of a power failure). It also stores any open documents before putting your computer into a low-power state which allows for a quick Reboot later on. When hybrid sleep is turned on, putting your computer into sleep automatically puts your computer into hybrid sleep.

Source: http://mintywhite.com/windows-7/7maintenance/hibernate-sleep-shutdown/

Monday, March 7, 2011

How to Attach Sticky-Note Reminders to Windows and Applications

Friendly Computers would to share this article with you.

image

Some applications come with a boatload of keyboard shortcuts; these can make you very fast, but can be difficult to remember, especially if you customized some of them. What if you could have your own little cheat sheet that would pop up next to the application every time your ran it? Read on to see how you can make one.

We’re going to be using an excellent (and free) application called Stickies. If you don’t have it yet, go to the Stickies homepage, download it, and install it.

Creating Your First Cheat Sheet

The first thing we’re going to do is create the sticky note containing whatever info you want to have on hand. With Stickies running, hit Win+S. You should see a blank sticky note, much like the one below.

screenshot_174

Yours may not have the current date and time in the caption – that’s a setting you can toggle, but we don’t need it for now.

Next, set the title for your sticky by clicking it and pressing Ctrl+Shift+T. You can also right-click the caption and select Set Title from the context menu.

image

Now that you’ve set the title (say, Total Commander Tips), fill in the text with whatever you’d like to remember. Use Ctrl + and Ctrl – to increase or decrease the font size, Ctrl+B for bold, Ctrl+I for italics. You can also select just a portion of the text to make it larger (think subheadings).

With your sticky note all ready, it’s now time to attach it to the window. Make sure the “target application” is running, so we’d have a window to attach the note to. Then, right-click the note’s caption and select Attach.

image

In the Attach Sticky window, locate your application in the list and click it. You can also toggle the box that says “Only if visible” to have the note visible only when the application window isn’t minimized.

image

The sticky note you created will now appear whenever you run your application, and disappear when you close the app. If you’d like to make the note always on top, click it and hit Ctrl+T. This way no other windows would cover it. That’s it – you now have a handy application-specific cheat-sheet.

Source: http://www.howtogeek.com/howto/45189/how-to-attach-sticky-note-reminders-to-windows-and-applications/

Secrets to Making the iPad Your Only Mobile PC

Friendly Computers found this article interesting and would like to share it with you.

There are a lot of reasons to rely on the Apple iPad as your sole, or primary mobile computing device. It is smaller, lighter, has longer battery life, and offers a more functional user interface than a notebook for staying productive on the go. iOS is a "mobile" OS, while Windows and Mac OS X are "desktop" operating systems--you do the math.

Still, out of the box the iPad is primarily geared for Web surfing, watching movies, playing music, and reading eBooks. It takes a little tweaking to get the right tools in place to optimize the iPad for use as a mobile computing platform for business, and not just for entertainment.

The iPad can replace your notebook, but only with the right tools in place.Typing: OK. This is not a tool, but the lack of a physical keyboard is a common jab made at the iPad when it comes to considering it as a productivity tool for business. Let me just say that the vast majority of you use the two-finger hunt and peck typing method anyway, and are not 100 word-per-minute typing speed demons. The iPad display sensitivity is the best I have seen on tablets and smartphones, and you should be able to hunt and peck your way around just as fast as you do at your desktop keyboard.

E-mail: E-mail is arguably the most important function of a mobile computing device. You can set your e-mail accounts up on the iPad, but if you want to make sure you get your messages on your desktop PC, as well as your iPad you need to make sure the account is set up properly. The iPad e-mail settings can be configured to delete the message from the server when it removed from the Inbox, after seven days, or never. You need to also make sure that your PC e-mail software is configured to leave the message on the server for a period of time as well so that both devices can get the message rather than one stealing it before the other.

A better option is to either use an Exchange e-mail account, or a webmail like Google's Gmail. With Exchange, the Inbox and folders on the iPad are kept in sync with the information on the Exchange Server and the PC, so there is no worry about the one device getting the message before another. With webmail, both the PC and the iPad would be accessing the same information on the Web so there is no reason for conflict.

Productivity: You need to be able to work with documents while on the go. You might not write the next great American novel on your iPad, but you at least need to be able to open and edit Microsoft Office files. Get the DocumentsToGo app to be able to view, edit, and create Microsoft Word, Excel, and PowerPoint files. DocumentsToGo also lets you view Adobe PDF and Apple iWork files, and it can view, edit, and sync with online file storage such as Box.net--which we will cover next.

Files: One of the hardest parts about having both a desktop PC and a tablet as a mobile device is syncing and managing files. For one thing, Apple's iOS doesn't provide any direct file and folder structure like a desktop OS, and even if it did, it would be a pain to remember to sync the files you might need while on the go. The better solution is to adopt an online file storage solution like Box.net or SugarSync. If you use online file storage by default from both your PC and your iPad, the files will always be available online to both platforms and you won't get stuck without access to a critical file.

Access the Network: Sometimes you might need to connect to applications or data hosted on company servers. Of course, you don't want to be connecting to company resources using the insecure connection at your local neighborhood Starbucks. A VPN client like Cisco AnyConnect can let you connect securely to the applications and data you need. To use the Cisco AnyConnect app, your company has to be have the right Cisco VPN tools and licensing in place. There are other VPN options, though, including the VPN tool built in to iOS.

Access Your PC: After all is said and done, there may still be some software that runs on your PC that you simply can't replace on your iPad. That is where remote desktop solutions come in. Apps like Citrix GoToMyPC and LogMeIn Ignition enable you to establish a remote connection back to the PC sitting at your desk, and work with the software and data on it as if you were sitting in front of it.

By installing the right apps and adopting a few simple practices, the iPad can be everything you need in a mobile computing platform. Even better, it can deliver in a tablet that is thin, and light, and has the battery endurance to last all day.

Source: http://www.pcworld.com/businesscenter/article/221486/secrets_to_making_the_ipad_your_only_mobile_pc.html#tk.hp_new

Wednesday, August 18, 2010

15 Things Every PC User Should Know

Friendly Computers would like to share with you 15 things every PC user should know.

Think you know tech? If you don't have a handle on every single one of these 15 tech facts, habits, and efficiency tricks, you're not living up to your potential.

1. Don't double-click everything. Windows 101: Double-clicking is how you open items in Windows. It's not how you open links in your Web browser, click buttons in dialog boxes, or do pretty much anything else--and if you reflexively double-click, you might accidentally zip right past something important or submit a form twice. If you don't need this reminder yourself, chances are you know someone who does.

2. Use slashes and backslashes in the appropriate situations. Let's get it straight: / is a slash (or forward slash, if you must), and \ is a backslash. Backslashes are conventionally used for Windows file paths (C:\Program Files\Whatever), while slashes are used for Internet addresses (http://www.pcworld.com/howto.html).

3. Record the exact error message. When your PC crashes, it'll usually try to tell you why it is doing so--albeit with a string of numbers and letters that you won't understand. Write the message down in its entirety (or take a screenshot, if possible) so you can later plug it into Google or give it to your tech support agent. If your PC didn't provide an error message, go to Action Center (in the Control Panel) and see if it shows up under 'View archived messages' or 'View problems to report'.

4. Bring deleted files back from the dead. When you delete a file from your PC or memory card, you're not wiping it off the actual hard drive. Instead, you're simply removing the index information that tells your PC where the file is, at which point the PC is free to treat the part of your disk that contain that file as empty space that it can write something else to. If you've accidentally deleted something, undelete utilities such as Recuva can help you find those files again as long as you haven't already written over that file with something new.

DBAN; click for full-size image.Don't leave your personal data on your old PC's hard drive. Nuke it completely with Darik's Boot and Nuke.

5. Wipe your hard drive before getting rid of it.Because your PC doesn't immediately get rid of the files you delete, you can't just reformat your hard drive before recycling or selling your old computer--because someone might be able to use an undelete app to recover your sensitive data. We have all kinds of tips for completely erasing an old drive, but the short version is: grab Darik's Boot and Nuke.

Uncheck the boxes; click for full-size image.Want a totally worthless toolbar added to your browser? No? Then uncheck the box for that option before you install updates.

6. Uncheck the boxes before you install. Lots of helpful apps out there give you the option of installing search toolbars and other add-ons--and some of them are so pushy about being helpful that their installers are configured to install the uninvited extras unless you check a box saying you don't want them. Not only is each add-on another thing that your PC needs to load, but you have no idea what kind of data it could be sending out. They come bundled with the app because they make money for the app developer, not because they're particularly useful. So take a close look at what you're installing before you click Install--and in return, the installer won't change your search engine or install apps you don't need.

7. Beware of viruses living in Office docs. Experienced Microsoft Office users can take advantage of its built-in Visual Basic for Applications support to automate complex tasks with macros. However, malicious coders can use those same tools to design viruses that may interfere with your work and that of your colleagues. By default, Office is set to disable all macros and notify you when a doc you're reading contains them (to toggle this setting, in Word, select Word Options, Trust Center, Trust Center Settings, Macro Settings), so you should already be safe on this score.

8. Be skeptical of "cleaning" apps. Apps that make vague claims about improving your PC's performance and clearing out its clutter (Registry cleaners, I'm looking at you) will generally do more harm than good (if they do anything at all). To clean up your system, simply run Disk Cleanup (to reach it, select Start Menu, All programs, Accessories, System Tools); it comes with every Windows installation and it won't mess up your PC.

9. Uninstall your old apps. If you regularly download and install new apps from the Internet, you should get in the habit of pruning your collection every now and then. To do so, open the Programs and Features control panel, scroll through the list, and click Uninstall to ditch items you no longer want. You may need to take a trip into your C:/Program Files/ folder to hunt down a few additional unused apps. The less stuff you have on your PC, the less things are to go wrong.

10. Don't let a spilled drink ruin your laptop. If you keep your cool when a spill occurs, you may be able to prevent your data from disappearing and your motherboard from frying. Instead of panicking, quickly but methodically unplug the power cord and yank out the battery--don't wait for Windows to power off. Next, detach anything connected to the PC (network cables, USB devices) and pull out any readily removable components such as an optical drive. Tilt the laptop to try to drain the liquid in the direction that it spilled onto your PC, but be careful--you don't want to tilt the laptop in a direction that would allow the liquid to seep even deeper in. If you see liquid on the surface of the laptop, dab it off with a towel. At this point, unless you're comfortable disassembling your PC and cleaning it with electronics cleaner, you'll probably want to take it to a tech.

11. Turn down UAC. Both Windows 7 and Windows Vista include a security function called User Account Control, which dims the screen and flashes a dialog box whenever you install an app or change your system settings. Though this arrangement can be useful for catching sneaky apps that are trying to install or change things without your knowledge, it can also be annoying. If you use Vista, grab TweakUAC to make it less annoying without turning it off. If you use Windows 7, the default settings aren't too bad, but I recommend that you go into the User Accounts control panel, click User Account Control settings, and change the setting to the third notch down, so UAC will still warn you but it won't dim the screen.

12. Don't work in your admin account. Many PC users are accustomed to doing their everyday work while logged in to their PC's administrator account--especially in Windows XP. Doing so can save you the hassle of having to log in and out when you want to install apps or make changes, but it also leaves you much more vulnerable to viruses and malware--so don't do it.

Icon View; click for full-size image.The Control Panel is far easier to navigate when you can see all the icons at a glance.

13. Keep your Control Panel in Icon View. The Control Panel's Categories view can be useful if you're intimidated by the many different options available, but it can also make finding what you're looking for more difficult (especially if you're following detailed instructions that refer to the control panels by name). Click Classic view on the left (in Vista) or choose Large Icons from the View bydropdown menu in the upper right (in Windows 7), and you'll have ready access to all of the control panels.

Notification Area Icons; click for full-size image.Limit the clutter in your system tray by paring down the list of icons that occupy it.

14. Clear your system tray.Apps often park themselves in the system tray (the row of icons on the right side of your taskbar) and stay open without your realizing it. Take the time to clear it out occasionally. Open the Notification Area Icons control panel, and check the box on the bottom that says Always show all icons and notifications on the taskbar to get a sense of how cluttered your system tray is; then right-click each one you don't need and choose Close. Your RAM will thank you.

15. Manage your power settings. If you're using a laptop, you'll want to know how to change your power settings so your PC doesn't waste battery when you need to conserve it, doesn't slow down when you need to go fast, and doesn't go to sleep at an inopportune moment. Open the Power Options control panel, and choose from among several presets containing different configurations for when you're plugged in and when you're mobile--or feel free to create your own. To access the advanced settings, click Change plan settings, Change advanced settings; there you'll find detailed options related to your battery, Wi-Fi radio, graphics card, and more.

Source: http://www.pcworld.com/article/203395/15_things_every_pc_user_should_know.html

Friday, August 13, 2010

How to Rename Libraries, Computer, and Favorites in Windows 7 Explorer’s Navigation Pane

Friendly Computers would like to share this article with Windows 7 users.

Today in this tutorial, we'll tell you how to rename these items present in Navigation pane. By default, Windows only allows you to rename "Computer" item. You can right-click on it and select "Rename" and type whatever name you want to give.

But what about other items? You can rename them too using a simple registry trick which is mentioned in the coming steps.

http://img.photobucket.com/albums/v374/vishaal_here/Rename_Favorites_Libraries_Homegroup_Win_7.png

We'll modify the same registry keys which we modified in the above mentioned tutorials to remove the items. We'll just edit a String value "LocalizedString" for each Navigation pane item and give it our desired name.

So without wasting any time, lets start the tutorial:

1. Type regedit in RUN or startmenu search box and press Enter. It'll open Registry Editor.

2. Now go to any of following keys according to your requirements:

Favorites - HKEY_CLASSES_ROOT\CLSID\{323CA680-C24D-4099-B94D-446DD2D7249E}
Libraries - HKEY_CLASSES_ROOT\CLSID\{031E4825-7B94-4dc3-B131-E946B44C8DD5}
Homegroup - HKEY_CLASSES_ROOT\CLSID\{B4FB3F98-C1EA-428d-A78A-D1F5659CBA93}
Network - HKEY_CLASSES_ROOT\CLSID\{F02C1A0D-BE21-4350-88B0-7367FC96EF3C}

3. Now you'll need to change value of "LocalizedString" String value present in the right-side section. But Windows will not allow you to change its value as you won't have proper permissions.

You can use following simple steps to take permission:

Right-click on the key mentioned in Step 2 and select "Permissions...".

It'll open a dialog box, Click on "Advanced" button.

It'll open another dialog box, Go to "Owner" tab.

Select your Username from the list and click on "Apply" button and then OK.

Again click on OK button in the first dialog box.

Now again right-click on the same key and select "Permissions...".

Select your Username in the list and check the "Allow" option for "Full Control".

Click on Apply button and then OK.

4. Now double-click on "LocalizedString" String value given in right-side section and change its value to any desired name like "PC Favorites", "My Libraries", "Home Network", etc.

5. That's it. Now open My Computer and you'll see the new names for each item.

NOTE: If you want to restore the default names, you can use following default values of "LocalizedString" String value:

Favorites - @%SystemRoot%\system32\shell32.dll,-21796
Libraries - @%SystemRoot%\system32\shell32.dll,-50691
Homegroup - @%SystemRoot%\system32\shell32.dll,-50688
Network - @%systemroot%\system32\NetworkExplorer.dll,-1

Source: http://www.askvg.com/how-to-rename-favorites-libraries-homegroup-computer-and-network-items-in-windows-7-explorer’s-navigation-pane/

Monday, August 2, 2010

Checklist Guide for Reinstalling Windows

Friendly Computers found this checklist guide for reinstalling Windows very useful and would like to share it with you.

Do you need to reinstall Windows on your computer?  Here’s a checklist of the things you should do before you make the leap and reinstall.

Whether you’re replacing a dying hard drive in your computer or want to upgrade from XP to Windows 7, there are many reasons you may want to reinstall Windows.  Vista and Windows 7 are much less prone to major OS issues that require you to reinstall Windows, but there are many things that can make a reinstall needed.  Many people are worried about losing data when reinstalling Windows.  However, if you make sure you cover all the things in this list, you should be certain to have your new install of Windows running great with all of your data and programs running as before.

sshot-2010-08-01-[21-09-08]

Back up Your Files

As more and more of our lives and memories are stored on computers, losing your files is not an option.  We strongly urge everyone to always have complete backups of their data, but even still, you may have many files you need to move when installing Windows.  You’ll want to have a copy of your documents, music, videos, pictures, and more copied to another hard drive or disk before you reinstall.  If you’ve never changed the default storage locations, most of your files should be stored in your User folder, which you can access by entering%UserProfile% in the address bar in Explorer.

You can copy the files to an external hard drive, flash drive, DVD, Cloud Storage, or even another partition on your primary hard drive; just make sure not to delete the files during the upgrade.

Backup Email

Many programs such as Outlook save data on your computer as well, and if you forget to backup Outlook data you can lose years of work.  Here’s how you can copy your PST files from Outlook to your backup drive so you can easily add them to Outlook again once you reinstall Windows.

sshot-2010-08-01-[16-41-02]

sshot-2010-08-01-[16-42-58]

Find Your Programs to Reinstall

Windows without programs doesn’t let you do much with your computer, so you’ll want to make sure you can easily install all of your programs again once you’ve reinstalled.  You could make a list of all your installed programs from your All Programs menu in the Start menu, or you could look through your Program files folders to see what you currently have installed.  Then, you’ll need to locate product keys for commercial programs.

image

This can be difficult and time consuming, so thankfully there’s easier tools to help you find all your programs.  System Information for Windows is free for personal use and a great tool that will list the programs you have installed on your computer, as well as the product keys you’ve used to activate them.  It will also list all of your hardware, so you can download drivers if Windows doesn’t automatically find them with Windows update.

Check out our article on how to get detailed information about your PC.

sshot-2010-08-01-[16-46-01]

If you have lost the installer disks for your programs, a quick web search can often turn up trial downloads that you can activate with your existing product keys that you may have found with SIW.  Or, you could try out some alternates to the programs you’ve been using for years.

Great Free Alternatives to Popular Programs

If you’ve been using your computer for many years, you may have a variety of old for-pay and shareware programs installed on your computer.  When you look through your list of applications, you might want to consider trying out some newer, free alternatives to other programs.  Here’s some we like:

  • Antivirus Microsoft Security Essentials is a great, free antivirus and antimalware application, which you can use instead of Norton, MacAfee, or other expensive antivirus solutions.  Check our overview of the new MSE 2.0 beta, too.
  • Archiving Files – Were you using an older version of WinZip or WinRAR before?  Try out 7-zip; it’s an excellent free alternative that works with most file archival formats such as zip, rar, cab, and more.
  • CD/DVD Burning – Windows 7 can burn ISO files to disks without extra software, but if you need extra features, try out the free ImgBurn instead of reinstalling the copy of Roxio or Nero that came with your computer.
  • Windows Live Essentials includes Mail, Photo Gallery, Movie Maker, Messenger, and Writer, all of which are great tools that can replace many other for-pay programs.  The new Beta edition includes even more features, including advanced photo merge and touchup tools in Photo Gallery that previously were only available in tools like Photoshop Elements.  For more photo tools, try out Paint.NET or Picasa.
  • Music and Video Tools – Most of us don’t pay for media player programs, but while you’re reinstalling, why not try out new programs such as Zune for Windows or the fully customizable Foobar2000 music player.
  • If you’re looking for replacements for other applications, check out the Alternatives website.  This site lists for-pay and free alternatives to many popular programs, and you might even discover some you’ve never heard of.

Cloud Applications

This could also be a good opportunity to try out more online applications.  From Google Apps and the new Office Web Apps to Mint.com and Picnik, there are web apps that can replace many standard desktop applications today.  If you have broadband internet connection, web apps can often be a great way to use newer applications for free.

sshot-2010-08-01-[21-01-07]

You may still want to keep Microsoft Office installed for the times you need to work offline, the service goes down, or you lose your web connection. Even if you use an older version of Office, you might want to keep it incase you’re not comfortable putting all your documents online.

sshot-2010-08-01-[21-03-15]

Installing Windows

When you’ve got all your data and programs backed up, you’re ready to install Windows.  You can install it from a DVD as normal, or if you have USB flash drive you could install Windows directly from it.  We’ve recently installed Windows 7 on a new hard drive in only 15 minutes from a flash drive; it’s amazingly quick. 

Once you’ve got Windows installed again, you’ve got 30 days to activate it.  But, if you’d like more time to make sure everything’s working properly, here’s yow you can extend the trial to 120 days so you can use it for nearly 4 months without activating.  That should be more than enough time to make sure everything’s working perfectly!

Quickly and Automatically Reinstall Apps

You can now copy your files back from your backups and get your programs reinstalled.  No one likes clicking through dozens of installers, so we recommend you try out Ninite, a great tool that makes it a snap to install a lot of free and trial programs in a couple clicks.  Check out our review of Ninite for more info.

Conclusion

Don’t forget to keep your clean install of Windows up to date with Microsoft Update and protected with Security Essentials!  Also, make sure to setup a good backup solution such as Windows Backup and Restore to make sure you don’t lose any of your data if your new hard drive suddenly dies.

Source: http://www.howtogeek.com/howto/23890/checklist-guide-for-reinstalling-windows/

Friday, July 30, 2010

Your Windows 7 Reliability Monitor

Friendly Computers found this article useful to keep your PC on the right track and would like to share it with you.

One of the cool little features that arose from the ashes of the disaster known as Windows Vista was the Reliability Monitor. A little-known tool which is almost hidden within the action center, the Reliability tool is great for tracking your computers reliability.

I remember using it when I was running Vista and nearly forgot about it until I was reminded by a weekly podcast to which I subscribe. I did my best to see if we have ever covered the Reliability Monitor here on Windows7News and as far as I can tell, we haven’t.

“Reliability Monitor is an advanced tool that measures hardware and software problems and other changes to your computer. It provides a stability index that ranges from 1 (the least stable) to 10 (the most stable). You can use the index to help evaluate the reliability of your computer. Any change you make to your computer or problem that occurs on your computer affects the stability index.”

Per Microsoft, the Reliability Monitor is intended for advanced computer users, such as software developers and network administrators, but it is easy to use, so even moderate users will have no problem using the tool to track their system over time.

There are two ways to find your PC’s Reliability history:

You can use Windows Search and begin typing the word ‘Reliability’ until the option shows.

Or

Right-click on the white flag in your taskbar to open Action Center.

Click Maintenance. Then, under Check for solutions to problem reports, clickView reliability history.

rel1 400x435 Your Windows 7 Reliability Monitor

In Reliability Monitor, you can:

  • Click any event on the graph to view its details.

  • Click Days, or Weeks, to view the stability index over a specific period of time.

  • Click items in the Action column to view more information about it.

  • Click View all problem reports to view only the problems that have occurred on your computer. This view does not include the other computer events that show up in Reliability Monitor, such as events about software installation.

The layout of the program is pretty self-explanatory and very basic.

rel2 Your Windows 7 Reliability Monitor

You can click on specific unreliable instances to view the details.

rel3 400x266 Your Windows 7 Reliability Monitor

The Reliability Monitor is a very basic program with a very basic use. It’s one of the many useful tools provided natively in Windows 7 which can help you keep your PC on the right track.

Source: http://www.windows7news.com/2010/07/28/reliability-monitor/

Wednesday, July 28, 2010

What's Useful in the Safari Extensions Gallery

Friendly Computers would like to help you to choose some useful Safari Extensions.

Safari's Extensions Gallery has gone live, and there's quite a bit to look through and add to your browser at launch. We took a gander through the offerings and picked out some of the extensions worth noting. Here's the list.

To use these extensions, you'll need to have Safari installed, and have it updated to the latest version. Both Macs and Windows installations have Apple's updating software you can use to grab the 5.0.1 copy, but if you've disabled Apple's Software Update on Windows, you'll need to grab a fresh copy manually.

We've provided links to the extension maker and a direct installation link for each extension we picked out, with each link coming from the extension maker. You may be asked whether you want to Open or Save the file we're linking to (choose "Open"), and if you're sure you want to install that extension ("Install," we presume). To manage these extensions once you've got them installed, head to your Safari preferences and look for the newly-enabled Extensions menu.

Social Networking

What's Useful in the Safari Extensions GalleryBetter Facebook: Automatically hides posts you've already read, removes some of the cruft from the site, notifies you of new comments and un-friendings, and more. [Install in Safari]

Shut Up: Kills comments on many sites where you might get sick of them. [Install in Safari]

Bookmarking

Procrastinate: Adds text articles to bookmarking and reading services like Instapaper, Read it Later, and Delicious from an all-in-one toolbar button. [Install in Safari]

Twitter Tools

What's Useful in the Safari Extensions Gallery
Twitter for Safari: Twitter's official client for sending tweets, but also reading tweets and seeing Twitter profiles related to the page you're on. You can easily tweet about a page you're looking at, too, with a pre-shortened URL. [Install in Safari]

E-mail

GmailThis: Sends an email through Gmail's compose window, with the page you're on pre-loaded in the subject and body text. Basically, a fancy bookmarklet, but with a nice button. [Install in Safari]

What's Useful in the Safari Extensions GalleryTrueNew Count for Gmail and Google Apps: More than just providing a count of the messages marked unread, TrueNew's counter shows you how many messages are unread since the last time you looked at Gmail or Google Apps. [Install in Safari]

Shopping

InvisibleHand: Like the Firefox and (slightly scandalous) Chrome extensions, InvisibleHand checks the shopping item pages you're looking at to see if the item is offered elsewhere—Amazon, Buy.com, and the like—at a cheaper price. [Install in Safari]

Entertainment

A Cleaner YouTube: Claims to transform YouTube into a "quiet and peaceful place" by cutting out most of everything except the video itself. [Install in Safari]

Turn Off the Lights: As with its nifty Chrome counterpart, this little button throws a shade over everything except the video you're watching on YouTube, Vimeo, or embedded clips. [Install in Safari]

Security

What's Useful in the Safari Extensions Gallery
LastPass: One of our favorite universal password systems, LastPass is an elegant little plug-in for storing your passwords, filling them in automatically, and yet keeping them encrypted and available anywhere you go. [Install in Safari]

Web of Trust: Reads out everything the very excellent Web of Trust community knows about the site you're on—encryption, trustworthiness, vendor reliability for various components, and so on. [Install in Safari]

Photos

Awesome Screenshot: Like its Chrome counterpart, Awesome Screenshot handles the capture, annotation, sensitive data blurring, and upload/sharing aspects of grabbing web pages, no extra software needed. [Install in Safari]

Source: http://lifehacker.com/5598524/whats-useful-in-the-safari-extensions-gallery